Smart Star - My Arduino, Node.js and MQTT CheerLights Project
15 December 2012 by martin
A few years ago I bought a large outdoor Christmas decoration from our local
B&Q DIY store. It's made up of three rope lights (one blue, one green and
one reddish purple) arranged around a frame to form a Multi coloured Christmas
star. After just a couple of seasons the flashing control unit just stopped
working and the lights were useless. Despite knowing very little about
electronics I decided I should try to build my own control unit using an
Arduino. Then I read about the
Cheerlights
project. I figured that if I'm going to build a new controller then why not
build it so it can be hooked into Twitter and join in the CheerLights fun.
Here's a video of my "Smart Star" working.
[youtube=http://www.youtube.com/watch?v=vRsFYel0NrM&w=500]
Inititally you see the star is going through a pre-programmed standard light
sequequence. I then send a Tweet that includes a combination of the colours
in my star. The star then displays a light sequence based on the pattern
I sent in the Tweet. After a short while the star will go back to the
standard pre-programmed sequence until the next CheerLights Tweet is received.
CheerLights
is a festive, social project that aims to synchronise the Christmas
lights of many people around the world using Twitter. The concept is simple,
when someone Tweets a message that contains one or more colours then all the
connected lights should display that colour. Tweets should either mention
@cheerlights or include the hash tag #cheerlights to be picked up. Much more
information is available from the
CheerLights
web site. CheerLights republish their Twitter stream as an RSS feed to help
make it simpler to use but part of my motivation for doing this project was
to understand how to directly parse and analyse Twitter streams.
Obviously people can Tweet pretty much any colour they like, but since I only
have three colours in my star I decided to just ignore any other colours.
Although I still can't decide whether my purple light is actually red or
purple so I have set up my lights to respond to either. I also thought about
how to interpret patterns in messages that would light colours simultaneously,
but since most people only tweet a single colour I decided that was probably
overkill this year.
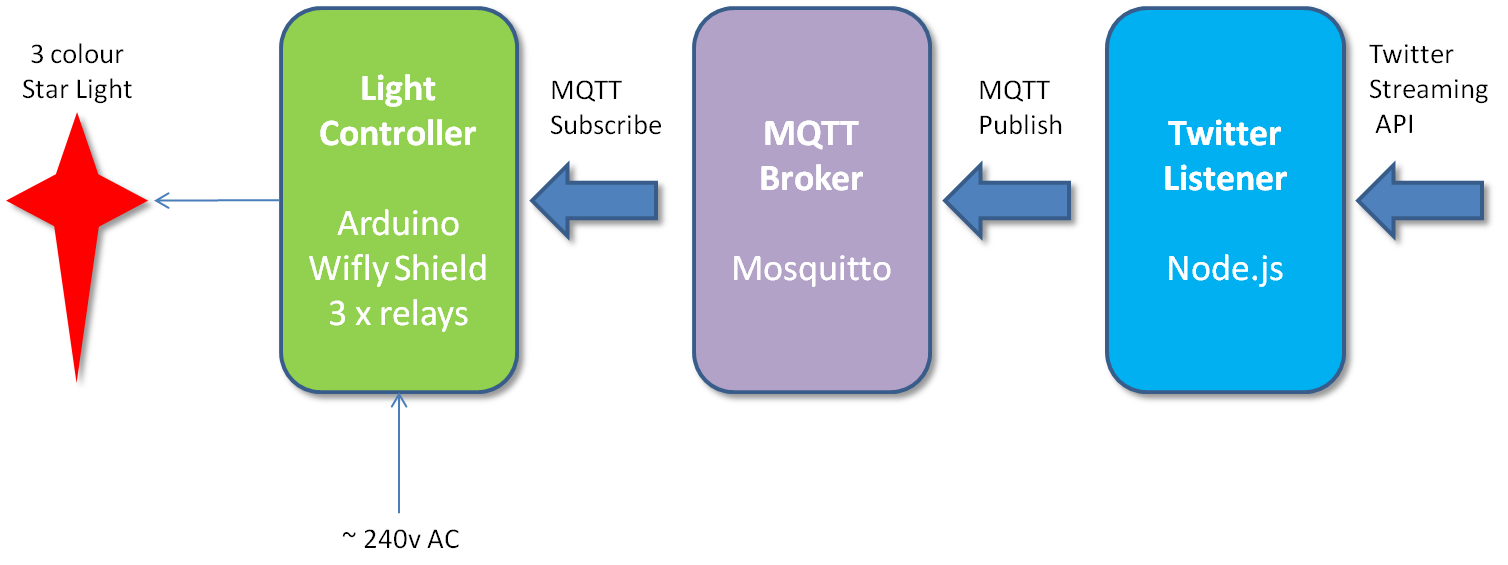
Here is an overview of all the components of the Smart Star.

Star Lights
As I said earlier the star is made of three separate rope lights, each one a
different colour. I was surprised to discover that the lights themselves
require mains power, that's 240v AC where I live. That's pretty dangerous
stuff so you have to be very careful. It also meant I was also going to have
to find some bigger relays that could cope with the higher current.
Light Controller
The controller is made up of an Arduino micro controller, a Sparkfun WiFly
shield for WiFi networking and three big relays I bought as
kits from Ciseco
.
I wasn't sure initially what relays to use with mains electricity but
Ciseco
were really helpful and pointed me in the right direction. The relays are
connected to three digital outputs on the Arduino. The controller subscribes
to an MQTT Topic for control instructions whilst cycling through a standard
sequence of light patterns. When a CHEER message is received through MQTT,
it parses the message and creates a new temporary light sequence that it
cycles through. After a short while it will switch back to the standard
sequence or respond to another CHEER message, whichever happens first. To
control switching the lights on and off it also listens for ON and OFF
messages.
My code for the Arduino
is up on Git Hub along with versions of the
Arduino MQTT
and
WiFly libraries
which I tweaked to make the whole system a little more resilient to networking issues.
MQTT Broker
MQTT
is a light weight publish and subscribe messaging protocol designed for small
devices. The MQTT protocol uses the concept of topics for the exchange of
messages between a publisher and one or more subscribers. The actual
communication between the MQTT broker and the publishers and subscribers
is over standard TCP sockets, hence the reason for using the WiFi shield on
the Arduino. I am using the open source
Mosquitto Server
as the MQTT broker, running on my little home server (a Mini-ITX server based
on an Intel Atom chipset running Ubuntu Linux). Mosquitto and MQTT are very
easy to implement and extremely reliable, I highly recommend them.
Twitter Listener
The listener connects to both Twitter's streaming API and to the MQTT broker.
When a suitable CheerLights message is received from Twitter it creates a
light pattern string and publishes it as a CHEER message to the MQTT Broker.
The light pattern is just a simple string where each coloured light is
represented by a single letter. The listener is implemented using Node.js
and relies on generally available node libraries for Twitter and MQTT
integration. The Liistener also uses a cron library to schedule sending OFF
and ON messages to the light controller at set times. The Listener run on the
same small Linux server as the MQTT Broker.
My code for the listener
is also up on GitHub.
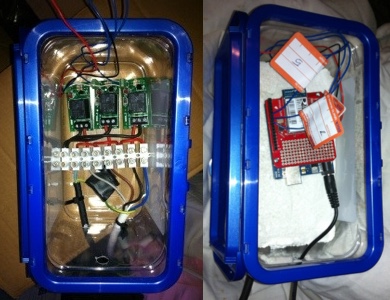
Project Box
I'm particularly pleased with my project box to house all the components.
With mains electricity it is very important to make sure fingers don't
accidentally touch electrical contacts. I also wanted to insulate the mains
components from the Arduino. My solution was a plastic washing soap container
with a hinged plastic lid. I was able to drill holes in the side just large
enough to feed the cables through and used cable ties to prevent them pulling
back through. The relays and mains wires sit below the Arduino and are
separated and insulated by a layer of polystyrene tile cut to size. The body
of the container is clear so I can keep an eye on all the LEDs without having
to open the container. It might not be pretty but it's safe and good enough
for just a months use.

My Raspberry Pi arrived after I had this set up working. I did consider
reimplementing the whole thing just using the PI or more likely a combination
of Arduino and Pi. That would have enabled me to remove the WiFly from the
solution and I probably would not have needed to use the MQTT Broker as the
Listener could have run directly on the Pi. May be next year!

Tony Hickman
17 December 2012
Very cool - I've been playing with something similar using my Raspberry PI so I'll re-use your Node.js code to give me a jump start on the twitter integration. I've already got the GPIO bridged to MQTT so joining things up should be simple

Robin Laurén
19 December 2012
How nifty!
I'm considering to implement my own Cheerlight using a BlinkM and some other bits and bobs i haven't really identified yet. Perhaps an Arduino nano + an Ethernet module, or perhaps a TP-Link TP-WR703n with an Arduino. Or something. Having been bitten by the MQTT bug, i too thought MQTT would be the perfect transport protocol.
I don't suppose you would allow worldwide read (subscribe) access to your MQTT server? On the other hand, maybe it would be a good excercise for me to set up a Node.js server on my other Pi. If it runs on such minimal hardware.

Robin Laurén
19 December 2012
Okay, congratulations -- you have me inspired!
I installed nodejs on my Pi. I downloaded your code. I quickly learned about npm. I installed npm and most modules, except for sugar, which just doesn't want to download. That means i'm missing the .each method (?) to look for cheer colours.
The suspense is a torture!

martin
19 December 2012
If you can't get sugar to work on the Pi you'll just have use a for loop and a bit of substring'ing to parse the Twitter message. Although I'm surprised sugar didn't work for you.

Robin Laurén
20 December 2012
Actually, shortly after i published my lament, i did get Sugar installed. But you're right. I just haven't doing any coding for the last ever.
I haven't checked through the Cheerlights specs, but what about using the full XColors list (http://en.wikipedia.org/wiki/Template:XColor) and parsing out the RGB as PWM values to LEDs?

martin
24 December 2012
Nice idea about XColor, if I do another CheerLights project next year using RGB LEDs I'll use that.

martin
30 December 2013
I updated my Cheerlights rig this year, replacing the Twitter listener with a simple Node-Red flow. I posted my flow as a Gist here https://gist.github.com/freakent/8186221.

Smart Star – Arduino, Node.js, and MQTT | CheerLights
09 September 2015
[…] Rube Goldberg is smiling. The “Smart Star” project links together many technologies and produces a very nice result. [Martin] created a […]